
All featured products are selected by our editors and may include affiliate links. If you purchase through these links, we may earn a commission.
If you feel tightness around your lower back or hips from sitting all day or working, you can barely move. But while you may be inclined to directly target your spine, or your waist, or your glutes, there is one particular muscle that might have a bigger role to play than we might think. And that is the PSOAS muscle, a deep hip flexor connecting your lower spine to your thigh. When inactive, it can become tense, which leads to pain or stiffness.
But because the muscle sits deep within our bodies, reaching it is a tricky proposition. It needs something that can target it effectively. That’s where something like a PSOAS release tool becomes a viable method to apply targeted pressure. And this is what the QL Claw is specifically designed for.
How Does the QL Claw Help Relieve the PSOAS Muscle?
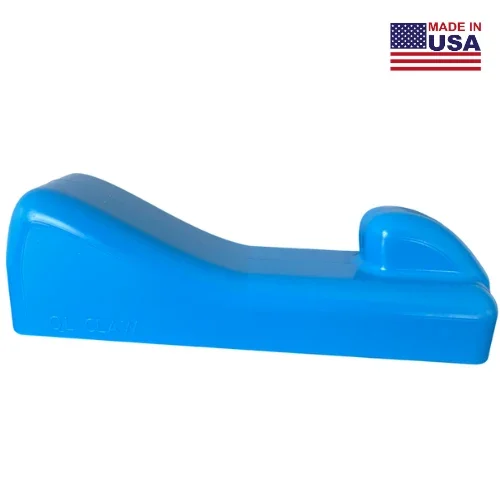
The PSOAS muscle sits deep within your body, so releasing it needs controlled, targeted pressure rather than just a simple massage. The QL Claw PSOAS release tool from Back Muscle Solution delivers that exact same pressure in a more precise way, thanks to the QL Claw’s larger ramp end. With that in mind, let's look at exactly how to use the QL Claw to better relieve the muscle.
How to Use a QL PSOAS Release Tool
Using the QL Claw for PSOAS release is fairly simple once you know where to place it and how to work with your breathing and body position.
Find the PSOAS Release Point
The target area sits between your belly button and the protruding hip bone, around the waistline. Position the large, ramp-shaped end of the QL Claw over this area, as this is the side designed for psoas release.
Position Yourself Over the QL Claw
Lie stomach first over the Claw and gradually lean your body toward the ramp. Don't immediately throw your full weight onto it; start with comfortable pressure and let your body settle into the position.
Breathe Into the Release
Take slow deep breaths into your belly as you remain over the Claw. Push slightly outward against the tool as you inhale, then let your body sink into it as you exhale, giving the muscle a chance to relax with each breath.
Increase Pressure With the Same-Side Glute
If you need more pressure, engage the glute on the same side you're releasing and lock that leg out so your knee lifts off the ground. This shifts more pressure toward the psoas without requiring you to force your body down onto the Claw.
Shift Your Opposite Leg
You can also bring the opposite knee out to the side while keeping that knee and foot on the ground. This subtly tilts your body toward the releasing side, allowing more of your weight to settle onto the Claw.
Elevate the Claw If Needed
If you're struggling to get enough pressure, place a book beneath the Claw to raise it about 1 to 3 inches. This can be particularly helpful if you have a larger waist or more abdominal tissue between your body and the tool.
Notice When the Trigger Point Releases
As a tight spot releases, you may feel the tissue give while the Claw sinks further into your body. The pressure can also start feeling noticeably less uncomfortable, but don't mistake pain for progress or try to force a release.
Repeat on the Other Side
Once you've finished one side, reposition yourself and repeat the process on the other. Keep the same gradual approach, using your breathing and comfort level to guide how much pressure you apply.
Safety Considerations to Keep in Mind When Releasing the PSOAS Muscle
A little patience and care go a long way when working on a deep muscle like the PSOAS. So here are a couple of tips for you to keep in mind when using the QL Claw for releasing the muscle for maximum effect and minimum discomfort.
Aim for around 2 to 3 minutes per side, as suggested by the QL Claw's instructions.
You may feel the muscle release sooner, so there is no need to stay on the tool for the full duration.
Stop if you experience sharp pain, significant discomfort, or bruising.
If you feel a pulse underneath the Claw, remove it immediately and reposition yourself.
Get up slowly after finishing the release rather than jumping straight back into activity.
Follow the release with gentle psoas or hip-flexor stretches if they feel comfortable.
Return to normal movement gradually instead of immediately putting heavy strain on the area.
FAQs
How Does PSOAS Muscle Release Work?
PSOAS muscle release uses controlled pressure, breathing and positioning to relax tension in this muscle. The QL Claw provides targeted pressure without you having to reach the muscle with your hands.
How Do You Stretch the PSOAS Muscle?
Gentle hip flexor stretches can help lengthen the PSOAS after releasing tension. Focus on controlled movement and avoid forcing the stretch or pushing into pain.
What Does PSOAS Release Feel Like?
PSOAS release can feel like a tight spot gradually softening or “giving” under pressure. You may also notice the QL Claw sinking further into the tissue as the trigger point releases.
How Do You Release a PSOAS Trigger Point?
To release the trigger point, position the Claw over the target area and slowly settle on the larger ramp end. Use slow belly breathing and allow the muscle to relax rather than forcing pressure.
What Are Some Self-PSOAS Release Techniques?
Self-PSOAS release techniques include targeted massage, deep breathing, gentle stretching, and controlled positioning.
Releasing a tight psoas doesn't have to mean guessing where to apply pressure or relying on aggressive massage. With the right positioning, controlled breathing, and gradual pressure, the QL Claw gives you a straightforward way to target this deep hip flexor at home. Start gently, listen to your body, and work both sides for a balanced release. If you're looking for a targeted psoas release tool, check out the QL Claw and see if it's right for you.
Stay tuned to CodesWodes for more body relief tips.